Skype for Business is the next generation of instant messaging for the business environment, making it easier than ever to find and connect with other students and colleagues.
Please Note: OneDrive service for students is active only for registered students. The service expires 30 days after graduation or if all classes are dropped.
Download on PC or Mac
1. Log into email.kpu.ca
2. Click Office 365 at the top left of the screen.
3. Click Other installs at the top right of the screen.
4. Click Skype for Business on the left of the screen.
5. Click Install.
Note: Installing the complete Office 2016 package also installs Skype for Business along with Word, Excel, PowerPoint, OneNote, Access, Publisher, and OneDrive for Business. For more information, click here.
Getting Started
How to sign in?
1. Launch Skype for Business by selecting the Start Menu and searching for Skype for Business.
2. Click on Skype for Business.
3. Under Sign in Address, enter your KPU email address and click on Sign in button.
Note: Skype for Business will automatically launch upon login for PC users unless you manually sign out.
How to change your availability?
By default, Skype for Business will determine your availability based on the calendar associated with your KPU account and your computer activity. If you are in a meeting on your calendar, you will appear “In a meeting”. However, if you walk away from your computer for more than 5 minutes, you will appear “Away” or “Inactive.”
To override this default and specify your own availability, Click the availability menu under your name, and then select a different status, such as Do Not Disturb.
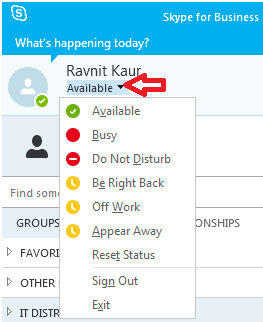
Note: When you manually override the default, your status will remain what you’ve manually set until you either change it to another status or return to the default settings.
How to change your social update?
Your social update is a personal note that lets other people know what’s happening today. It appears below your contact when someone adds you to their contacts list. To add a social update:
1. Click on “What’s happening today?” above your name, and then type a note, such as "Working from home".
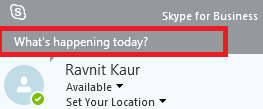
2. Press Enter to set your message.
How to change your location?
1. To specify a custom location, click on Set Your Location.
2. You will now see a text box. Type your current location and press enter.
How to hide/remove your location?
1. Click the black drop-down arrow to the right of the location.
2. Deselect Show Others My Location or select Remove All Custom Locations.
How to sign out?
1. Click the Availability menu under your name.
2. Select Sign Out.
How to exit out of Skype for Business?
1. Click the Availability menu under your name.
2. Select Exit. The Skype for Business window will close, and its icon will no longer appear in the Windows notification area.
Contacts and Groups
How to add a contact to your contacts list?
1. To add someone as a contact, type the email address of the person in the search bar, where it says “Find Someone”.
2. Right-click the person’s listing, choose Add to Contact List, and choose a group to add your new contact to.
By default, you will only have one group to choose called “Other Contacts.”
How to create groups for people?
You can set up a group for each team you work with so you can see at a glance who’s available at any given time, or communicate with the entire team at once.
1. To create a new group, click on Add a Contact button.
2. In the drop-down menu, select Create a New Group.
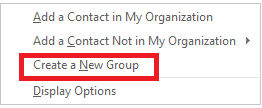
3. A new entry box will appear at the bottom of your contacts list. Type over the phrase New Group to give your group a name. Press Enter key to set it.
Note: You can send an instant message to an entire group by right clicking on the group name and selecting Send an IM.
How to view a person’s contact card?
1. Type the email address of the person in the search bar, where it says “Find Someone”.
2. Right-click the person’s listing and choose See Contact Card.
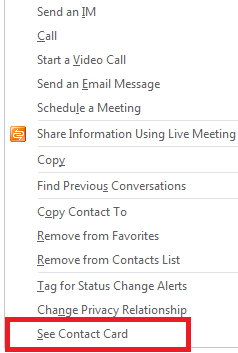
3. You can also see a contact card by placing your cursor on the person’s profile picture and clicking on contact card icon.
![]()
Instant Messages
How to send an instant message?
1. Locate the person you want to send an instant message to by finding their contact in Search or your Contacts list. Do one of the following:
- Hover over their presence icon (square with colour) in the Contacts list or search results and click the IM button in the shortcut menu.
![]()
- Double-click anywhere on their contact listing.
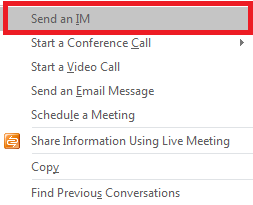
- Right-click their listing and select Send an IM.
2. To send an instant message to many people, hold down the Ctrl key and select multiple contacts or hold down the Shift key and select a series of contacts. Right-click and select Send an IM.
3. Type your message at bottom of the conversation window.
4. Press Enter or Return on your keyboard or select the Send button to send the message.
How to share a file or an image using instant message?
1. Drag-and-drop a saved file into the text input area of an instant message. Then, hit Enter or Return on the keyboard or select the Send button to send it, or:
2. Copy and paste a saved file or any image from an Office program into the text input area, or
How to invite another contact to a conversation?
1. Add others to the conversation by dragging their contact listing from your Contacts list into the conversation window, or:
2. Select the Invite more people button  and select contacts from your contact list or using the search option.
Voice Call
How to check your audio devices before a Skype call?
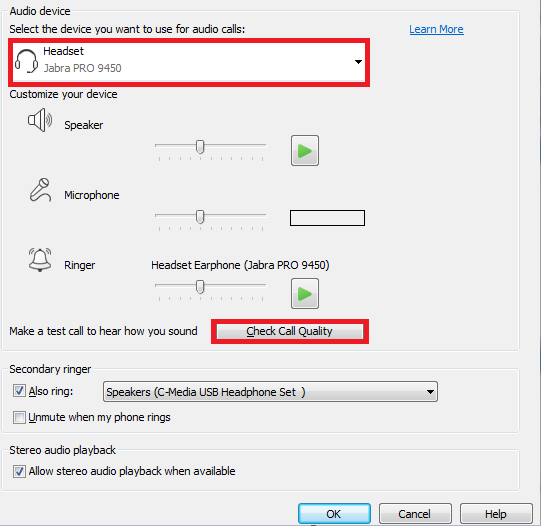
1. Before using Skype for Business to make a call, select your audio device and check the quality. You can use your computer’s mic and speakers or plug in a headset.
2. Click Select Primary Device in the lower-left corner of Skype for Business, then click Audio Device Settings.
3. Pick your device from the Audio Device menu, and adjust the speaker and microphone volume, as needed.
4. Select Check Call Quality to record a message and hear it played back.
How to initiate a voice Call?
1. Hover over the person’s picture and select the phone icon from the shortcut menu.
2. If you want to make a conference call to an existing group, right-click on the gray bar with the name of the group and select Start a Conference Call and then select Skype Call.
3. If you want to make a conference call to multiple people who do not exist in a group, hold down the Ctrl key and select multiple contacts. You can also hold down the Shift key and select a series of contacts. Right-click and select Start a Conference Call and then select Skype Call.
How to invite others to an ongoing call?
1. In the conversation window, point to the Invite More People button, and then click on Invite More People

2. Type the name(s) of the contact(s) you'd like to add or select the contact(s) from the list, and then click OK.
Your new invitees will receive a request to join your call.
How to manage call features (mute, call hold, end call)?
1. To put the call on hold, click the Hold button:

2. To mute your audio, click Microphone button or use the mute button on the cord of your headset. It will appear with a line through it when it is muted:

3. To hang up, click the red phone button in the conversation window. This will only hand up the voice and/or video portion of the call.

4. To close the conversation completely, close the conversation window by selecting the grey X.
Video Call
How to check your video devices before a Skype call?
1. If you are using an external webcam, plug it in to your computer.
2. Click Options in the Skype for Business interface, then click Video Device.
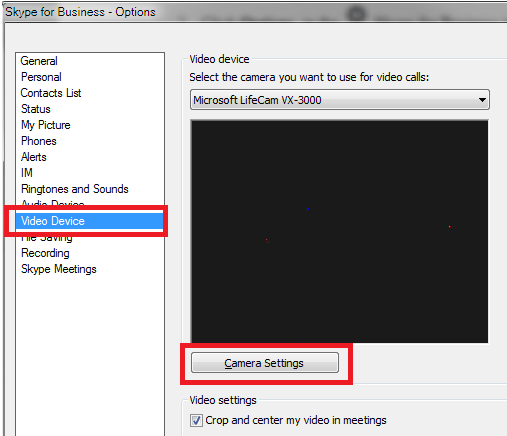
If you don’t see your video preview, make sure the camera is working correctly.
3. To adjust settings, click Camera Settings.
How to initiate a video call?
1. Hover over the person’s picture and select the camera icon from the shortcut menu.
![]()
2. Pause on the camera icon to preview your video.
3. Click on the camera icon or click Start My Video to initiate the video.
NOTE:
- You can continue to send instant messages to the call recipient(s) and also to other contacts.
- If you accept someone’s incoming video call, they won’t see you unless you add video from your side of the conversation.
How to stop or end a video call?
1. To end video, pause on the camera icon and select an option:
- Stop My Video: It ends your video, but you can still see other participants’ videos.
- Leave video: It ends all the videos for you, but you’ll still have audio.
2. To end the call completely, close the window by selecting the grey X in the upper right corner of the window.
Online Meeting
How to create an online meeting or conference call request?
1. You can create a meeting request with Skype for Business Web Scheduler.
2. Login using your KPU email address and the password.
3. Fill in the required details of the meeting and click Save.
4. A meeting link will be created. Copy the link and send it to participants.
How to join a meeting?
1. In Skype for Business, click the Meetings tab and double click on the listed Skype Meeting.
2. You can also open the meeting request and click the Join Skype Meeting hyperlink.
![]()
How to join Skype for Business Web App as a Guest?
1. From your email, open the Skype meeting request.
2. Click the Join Skype Meeting hyperlink.
If Skype for Business is not installed, Skype for Business Web App will launch in the browser.
3. Click Install and join Skype Meetings App (web).
4. Click on Run to install the Web App.
5. Click on Allow if it asks, "Do you want to allow this page to open Skype Meetings App?"
6. Enter your name and click Join.
7. If you receive another prompt for Skype for Business Web App Plug-in, click Allow.
How to share a desktop?
1. Double click on the contact name with who you want to share your Desktop.
2. Click on the desktop/present icon at the bottom and select Present Desktop.
If you have more than one monitor, you will see a preview of your monitors, and you can choose which one or both to share. When you share All Monitors, the sharing toolbar opens on your primary monitor.
3. On the sharing toolbar, click Give Control.
4. If you are sharing your desktop with multiple people, select the name of the person you want to give control to.
5. To take back control, click Give Control on the sharing toolbar again, and then click Take Back Control.
NOTE: You can enable people to automatically take control of your sharing session at any time, by clicking Give Control Automatically on the sharing toolbar. It is recommended to select this option only in small and casual meetings. To take back automatic permission, click Give Control on the sharing toolbar, and clear Give Control Automatically.
How to share a program?
1. Launch the program you’d like to share.
2. Double click on the contact name with who you want to share your Program.
3. Click on the desktop/present icon at the bottom and select Present Program.
4. Skype for Business will display all of the programs you currently have open. Select the program you’d like to share.
You will now be presenting the program. The window with the program will appear to have a yellow outline, and you’ll see the presenter’s toolbar at the top. You can use the options on the presenter’s toolbar to give control to others and end the presentation.
NOTE: If you are using a MAC, please use Skype for Business Web App to get this option.
How to share a PowerPoint Presentation?
1. Select the present icon and choose Present PowerPoint Files..
2. Find your presentation, and double-click on it to upload it in the meeting.
3. To move the slides, use the arrows at the bottom of the meeting, or the arrow keys on your keyboard.
4. If a slide contains a video, pause on the slide to unhide the video controls, such as Play, Pause or Stop. The audio plays for participants who used computer audio when joining. Any animations in the slides play just like they do outside the Skype for Business Meeting.
5. Press F5 on your keyboard to go to full-screen view, and Esc to go back to normal view.
Note: If someone else has uploaded and started sharing a PowerPoint presentation, you can move ahead or back to view the slides privately, or take control of the presentation. You must be designated as a presenter to do this. This won’t interrupt the meeting, and you’ll be able to return to the slide that the presenter is currently showing at any time. Just select Return to Presenter’s View.
Note: If you are using a MAC, please use Skype for Business Web App to get this option.
How to upload an attachment to the meeting?
1. Click on the present/monitor icon and choose Add Attachments…
2. Find and select your file and click on Open.
How to create a Whiteboard?
A Whiteboard is a blank page that you can use to work together with other meeting participants by being able to type notes, draw, or import images. When your meeting is over, you can save the Whiteboard with the data from the participants’ collaboration.
For more on interactive whiteboards, see Microsoft’s website.
How to create and conduct a Poll?
Conducting a poll is a great way to get measurable feedback on a question. Polls are anonymous, and you can choose whether to hide or show results to attendees. You can export the results as a PNG.
1. Select the present/monitor icon.
2. Choose More and select Poll.
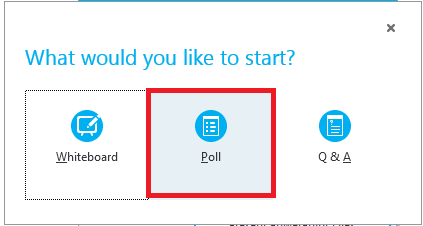
3. Give your poll a name.
4. Type a question to ask with the poll.
5. Provide choices.
6. Select Create to distribute to everyone in the session.
TIP: You can join your meeting and create a poll before your meeting starts.
How to use Q&A feature in Skype for Business?
The Q&A (question-and-answer) feature in Skype for Business provides a structured environment for answering questions during a meeting. This feature is especially helpful in large meetings where a presenter can answer questions, while someone else is presenting meeting content.
Note: Attendees and presenters can ask questions, but only presenters can answer.
Please refer to Microsoft's website to learn how to enable Q&A.
How to record meetings?
1. Click More options ![]() in the meeting window, and click Start Recording.
in the meeting window, and click Start Recording.
2. Use the controls at the bottom of the meeting room to pause, resume, or stop the recording.
Note:
- The recording of the meeting is saved on your local computer.
- When you begin recording, all attendees are notified.
- After you stop the recording, Skype for Business will save the recording in a format that plays in Windows Media Player.
How to play, rename, or delete a recording?
1.Click on black drop-down icon by the options icon.
2. Select Tools and then select Recording Manager.
3. Click on the record and then select Play, Browse, or Delete.